Showing posts with label Crusader Tank. Show all posts

Sunday, March 27, 2016

Rubicon Crusader WIP 5

Well, it is almost finished.
 This is the point I spot that I have forgotten to paint the lamp on the turret.
Not completely convinced about the Division and Regiment ID, but almost none of the contemporary photographs I can find have them, possibly an over zealous censor.


And now with flash...


Saturday, March 19, 2016

Rubicon Crusader WIP 4

Here are some more work in progress pictures.

First the replacement tarpaulin.
Next, the armatures added for the packs. Due to not being able to find the square section bar, I used some square section tube. They are pinned to the sand shields.
They are then filled with greenstuff and the top flap added. I used some microstrip to add the space for the straps. Once the greenstuff had set, 0.030" by 0.010" was used to produce the straps.
 Greenstuff was then used to add the straps holding the packs to the rail. Also a Rubicon German Stowage set bucket was added to the glacis, and filled with a rope removed from a Bolt Action British Commando pack.
This show the sand bags added to protect the driver.
 An additional roll was added to the engine deck.
The undercoated model. Normal method, Citadel Chaos Black undercoat then Humbrol Desert Yellow. I do wonder if Humbrol Desert Tan might have been a better colour.


Sunday, March 13, 2016

Rubicon Crusader WIP 3

Here are a couple of side views.
The front of the tarpaulin defies gravity a bit.
Really not happy with this tarpaulin.
 I grey coated it to see how it looked, and it still looks like rubbish.
 So I removed it, and will replace it.


Saturday, March 12, 2016

Rubicon Crusader WIP 2

So, I have had some time today to continue with the Crusader model.
Not paying attention I placed the tarpaulin on the right side lower than the photographs show.  I also added the jerry can rack. I also added two Bolt Action British helmets, one hanging from the left rear turret lift ring, the other hanging forward of the aerial.
 The tarpaulin on the box on the rear of the left hand side fouled the turret when I tested it, which then took a long time to clear. This meant that I did not manage to get it sculpted before it began to set.
 I added a sand bag on the right side of the driver's position. Unfortunately I also managed to work on both sides of the vehicle which meant that I had to wait for the green stuff to set properly so I did not leave finger prints on it.
 Returning to the model this evening, I added the first tarpaulin behind the tank rack. I will need to be careful to ensure the gun barrel does not foul when I add the rest.
 I also added two sand bags on the right hand side of the driver's position.
Slight excursion, I assembled the other tank turret as a Close Support 95mm howitzer. The only missing bit is the turret box, so I used some 6.3mm cross section rod to make a box and will cover it with Green Stuff as an alternative turret.

Friday, March 11, 2016

Rubican Crusader WIP

So, thanks to some research by me and other members of the Rubicon Forum, I have some pictures showing stowage on the Crusader cruiser tank.

I do have some concerns that the stowage may have differed between the Mk II and the Mk III, especially as the drawing in the George Bradford book shows the rail attached to the side skirts on the Mk II and not the Mk III.

On page 85 of the Osprey Publications book Campaign 220: Operation Crusader, there is a rear view of a Crusader tank with stowage on the rear deck, including a jerry can rack (useful as I used the wrong radiator grill, the one without the fuel tank fixings...).

So first up is the jerry can rack:
This uses four jerry cans from the Rubicon Models German Stowage 1 set (British forces made use of captured jerry cans plus British made copies (see earlier position including a War Department example).

For ease of removal, this is being built on a glass plate, PTFE plates would also work.

The rack is built up from 0.030" square cross section Slaters micro strip. There are spacers of the same material between the rails at the centre of each of the jerry cans.
End pieces were then added between the protruding rails to hold the cans in place. Each can is then strapped in place using 0.030" x 0.010" micro strip, first adding the strap through the handle and under the two bars (which mostly hides the spacers). This is trimmed to length when dry then the long strip is added. The picture above is the rack before trimming. The rack long side is then added, again from 0.030" square section micro strip.

Once dry, the rack will be removed from the glass plated trimmed. End pieces will be added and buckles added to the straps.

On the tank front, here is some work in progress shots.
The photographs I have seen with stowage show a long rail of rectangular cross section suspended from the side skirts. So first the rivets (sorry Rubicon) were removed along the line of the rail. Small square spacer sof 0.030" by 0.010" micro strip was then added. The white posts in the background are the mounting points for the stowage.
The rail itself is made from 0.040" square section Slaters micro strip, I did sand it down, first to remove raised parts where it is cut and second to make a more rectangular cross section.
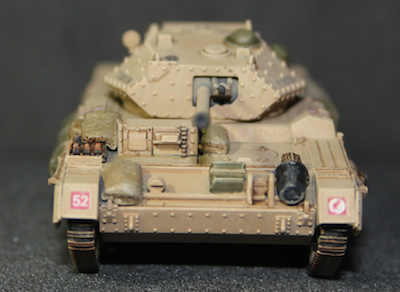
Checking it all fits together.

Only just, as you can see the long six pounder almost touches the centre post. This will need to be cut down and form the boundary point on the stowage.

The rear view picture in the Osprey book it shows a tarpaulin on the left rear stowage box (the two white posts showing its location), an assortment of tarpaulins wrapped round what looks like tent poles (the three posts on the rear deck will provide mounting points) and a wrapped box attached to the right rear mud guard (it has a white post as well).

Other photographs show stowage hanging from the rail, a sack of some kind will hang between the first and second front left road wheel. On the other side there are mounting points for another tarpaulin and I may add another couple of sacks.

All soft stowage will be sculpted in-situ with boxes and cans added.

Tuesday, December 1, 2015

More Rubicon WIP

Well, I have nearly finished the Panzer III, the hole I made on the glacis between the ventilator and the track guard still needs to be filled.
 The white crate is made from layers of Evergreen plastic strip to simulate planks, with a top surface of thin strip. Microstrip makes the reinforcements, and thin microstrip makes the straps. There are fill issues with the HO scale boxes, so I have filled them with Milliput.

Next is the Crusader III tank. Most of the body has been completed, though I have to add the front lights and bend up the guards from wire (a jig is supplied in the kit). The rear fuel tank is proving a problem as there are no fixing points (I might have shaved the locating points from the fuel tank when cleaning it up).
 I do need to add stowage, as the Desert Rats used German jerry cans, I will use the ones from the German Stowage set.

The last Rubicon kit I am assembling is a T34-85 tank. I started assembling the tank just before visiting the Imperial War Museum (IWM). The shape of the turret of the tank at the IWM is different to that of the Rubicon model, the model is not wrong, it is just a different version of the long lived tank. I have modified the profile and added the bulge to house the electric turret traverse motor.
This is going to be a Post-War Central Europe example, so it needs the reflector under the tank, I have modified the tanks to have the forward filler caps and some additional boxes. On the glacis I will add the brackets and the splash board. The mounting points for the smoke canister at the back needs to be removed.