Sunday, June 11, 2017

SDKFZ 234/2 Puma revisited

A couple of items on the Warlord Games Puma.

As mentioned earlier in the thread, for reasons best known to the Italeri/Warlord designers, a decision was made to mould the tyres/wheels hollow.
I decided to fill the backs of the tyres with Milliput. Unfortunately I did not photograph them before attaching them to the hull.

Here are two photographs of the wheels in place.
 I chose the best ones for the front and rear.
 I do need to paint the joins , probably black/burnt umber.
 It is very difficult to photograph the inside of the wheels, but the effect is not too bad,
The other item was the lack of damage to the doors on the mudguards. I have added some chipped paint effects to the doors and surrounding paintwork.

It probably needs some more.

Wednesday, June 7, 2017

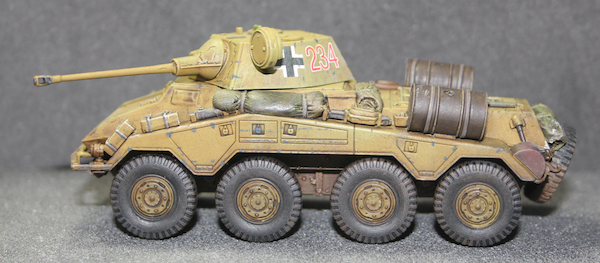
SDKFZ 234/2 Puma

This has been a long term project.

The eight wheels, the turret and the hull were undercoated with Citadel Chaos Black spray. The turret and hull were then sprayed with PSC Panzer Dark Yellow. The area of the lower hull under the mud guards had Citadel Stirland Mud textured paint applied. This was then covered with Vallejo Burnt Umber. This was then dry brushed with Citadel Steel Legion Drab. Citadel Agrax Earthshade was then washed over the whole body and turret.

After glueing the wheels in place (one needed a reinforcing bar added), the tyres were drybrushed with Vallejo Black Grey and a wash made from Citadel Nuln Oil and black was applied over the dry brushing.

The hull and turret were dry brushed with Vallejo Dunkelgelb. The wheel hubs were also painted with Vallejo Dunkelgelb. The hubs were washed with Agrax Eathshade.

The tyres and the mudguard were then dry brushed with Vallejo Burnt Umber .

As mentioned earlier, it has been fitted with an IR spotlight (made from a PSC Panther cupola) and two fuel drums (with a pump).
The "cracks" on the turret front (and elsewhere) are the result of a failing spray can.
 The Balkenkreuz is from the supplied decal sheet, but the numbers are from the Rubicon German AFV sheet (I am lazy and they come pre-assembled).


Zvezda Panzer 38(t) in 15mm

Many years ago I bought a Zvezda 15mm scale Panzer 38(t). As I had a spare moment I decided to assemble and paint it.

I added a spare wheel, spare track, a helmet, an ammo box and an MG ammo box from the PSC stowage and crew set. I also drilled and added a peg on the bustle and sculpted some soft stowage.

It was undercoated with Citadel Chaos Black spray. The hull and wheels were painted with Vallejo Black Grey. A mix of Vallejo black and Hull Red was applied to the track and the exhaust silencer.

The hull and turret were dry brushed with Humbrol 246.

The helmet was painted with Vallejo German Camouflage Dark Green.

As I do not have any 15mm scale decals, I raided the Warlord and Rubicon sheets. The Balkenkreuz was from Warlord, the number from two Rubicon German AFV sheets (only one set of small numbers per sheet).

After varnishing, a wash of Citadel Agrax Earthshade was added.


Comparison with the Warlord Games resin Panzer 38(t). It also uses the Rubicon numbers and the same size Warlord Balkenkreuz.


The Walking Dead - Salute figure

At Salute this year, Mantic games were giving away a free walker.

I have not started painting the main set of walkers, nor any of the walkers in the booster sets, though I have painted the five in the Prelude to Woodbury solo game set. They were painted using the same techniques set out in October 2015.

Now as this is an additional figure, I decided I would try an experiment. On the blog of Opponent Theory there is an excellent tutorial on painting Walking Dead zombies (link here, normal disclaimers apply).

Now, I suspect that Army Painter Leather Brown is a vastly different colour to Vallejo Leather Brown (or the colour balance on our cameras is vastly different). However I followed through using the colours I have.

First the figure was given a quick scrub and any mould lines removed. The base was covered with PVA and Woodland Scenics cinder extra fine ballast and two pieces of Evergreen 6.3mm plastic strip were added. Sometime in the future I want to print out a tiny copy of the Salute 2017 poster and add it to the base on one of the pieces of strip.

Once that was dry, the figure was undercoated with Citadel Chaos Black spray.

The flesh was painted with Vallejo Leather Brown. The Hair was Army painter Skeleton Bone. Skirt Vallejo Grey Blue. The shirt was Citadel Mephiston Red and the shoes Humbrol 246 grey blue.

Skeleton Bone was used to lighten each of the colours and applied to the highlight points (except the hair). This was repeated for each colour with a higher proportion of Skeleton Bone each time.

Wounds were painted with Citadel Mechrite Red.

The shirt was washed with Citadel Baal Red wash then shaded with Army Painter Red Tone. The skirt was shaded with Citadel Drakenhof Nightshade, as were the shoes. The hair was shaded with Citadel Seriphim Sepia (which has a more orangey colour than Citadel Agrax Earthshade but not as orangey as the original Citadel Flesh wash).

The flesh was shaded with Citadel Agrax Earthshade.

Blood stains were Citadel Baal Red.

A final highlight was dry brushed on the hair with Citadel Terminatus Stone and another shade wash with the Seraphim Sepia.


I think I like this colour scheme better than the previous one. I will probably use something similar when I finally start on the other walkers.

Saturday, June 3, 2017

Labours of Hercules - A Sherman VC

I have seen a number of photographs of British (and Commonwealth) Sherman tanks draped with the tracks of German tanks. It just made me think of the first labour of Hercules, the slaying of the Nemean Lion.

The Nemean Lion had impenetrable golden fur, Hercules slays the lion by (sources vary) shooting it in the mouth or beating it to death with his club. Hercules wears the pelt as armour.

So, this is the build of a Warlord Games Sherman VC as "Hercules", the slayer of big cats.

Sprue photographs. The track and side skirt sprue appear to be common with the Sherman V kit.

The upper hull is different from the Sherman V hull.
 The kit is quite chunky, verging on crude, no where near as good as the Warlord M4 kit nor both versions of the Rubicon M4A3 kits.

Once the main parts of the hull were assembled, the additional track pieces were added. The side pieces were added on to the appliqué armour. Square section 0.030" plastic rod was used to provide support for the track pieces where they went beyond the appliqué.

Additional stowage was added including a four pack of German style jerry cans, This used one half of part A11 from the Rubicon Allied Stowage set 1 (cut in half with a razor saw), one War Department jerry can from the same set and one German jerry can from the Rubicon German stowage set.
A base plate of 4mm Evergreen strip provided the base and a piece of Slaters plastic strip provided the straps.  The W^D logo is visible on the end can.
Two additional strips of plastic strip were glued to the jerry can block. This was then used to assist in glueing it to the back of the Sherman tank.


The Rebels

Here are the Rebel team for Rogue Stars.
Psionic Warrior, Heroic Fighter, Dashing Pilot, Reliable Co-Pilot.

The Psionic Warrior in action.


Reliable Co-Pilot

Karl Drax is a reliable man to have beside you in a firefight. He is devoted to Vic, but as a big brother.


Karl Drax from Hasslefree.