I built one of them on the Sunday after Salute.
At Warfare in Reading Warlord Games released their Armoured Fury starter set which came with three more M4s and two Panthers.
So, I am now the proud possessor of eight M4 Sherman kits.
Unlike the M4A3, the M4 was used in British and Commonwealth service, being referred to as the Sherman 1 (just add one to the number after the A, the M4 being effectively an M4A0. The A number does not indicate a later version, but a different construction or engine.).
The M4 as modelled by Warlord is an earlier version of the M4, not the earliest because of the position of the track return roller at the back of the bogie. It also has the original single hatch turret, which made the Sherman and its tendency to burst into flame a death trap for the loader.
The M4 kit builds a tank with the US 75mm gun, great for supporting infantry but rubbish against opposing tanks of the period 1944 onward (the tank counts in the Armoured Fury box feel a little in favour of the Panther). I am still waiting for a kit of the British Sherman Firefly with its high velocity 17 pounder gun.
There are plenty of books on the subject, and I referenced the New Vanguard book on the Sherman, British Tanks in Normandy by Ludovic Fortin (referred to later as BTN), British Armoured Vehicles by George Bradford. I also used the Osprey Modelling book on the US 76mm Sherman for ideas on stowage. The Sherman Minutia website is also a useful reference though I have not identified the particular manufacturer of the M4 represented by the kit (normal web site health warnings apply).
Research is important, when I was younger I built the Airfix kit and thought that there was only one Sherman style, but there are many, the Minutia page above being a good way of examining the differences.
Looking at the pictures, the first thing you notice is that the British Army tanks came ashore covered in kit. Experience in the desert led the tankers to want to have everything they could need. There is a picture on page 5 of BTN showing a Sherman Firefly carrying a ladder.
The problem is the availability of 28mm scale junk to pack on your tank. Warlord Games does a range of white metal accessories, unfortunately they are unsuitable for the light weight plastic models, and with the height of the Sherman tank it would make them unstable.
So I chose to use the bits from other Warlord Games kits.
One of the features of a number of pictures of British Shermans was the presence of track, either racked or welded to the glacis and turret. The problem is there is little available from Warlord Games kits. In the end I used a piece from the hull front of the Panzer IV. I also added a rack on the left front glacis above the left headlight assembly. This required the removal of the tow wire from the glacis.


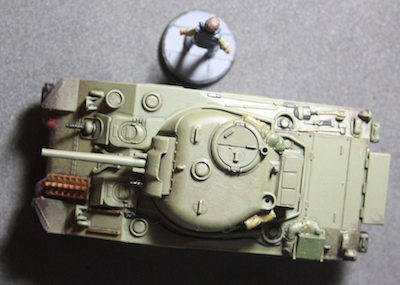
The distinctive "radio box" on the turret bustle is a feature of all Firefly tanks (the 17 pounder is so long it occupied the space normally occupied by the radio, so the radio was moved to a box attached to the bustle), However, there are a number of pictures and drawings showing non Firefly tanks with the same box. It alters the shape of the turret and is a distinctively British feature. It is built using 6.3mm square section Evergreen rod, the lid is a thinner section of Evergreen strip detailed with even thinner strip and microstrip.


Next up was a more cluttered Sherman 1.
Photographs, including the aforementioned BTN picture on page 5 show equipment stowage bars across the front of the mudguards. They look like rod or rebar welded to the hull. So I used two pieces of microrod. To give a strong base to the outer rod, I used two of the boxes from the Knightwing set as the load in the centre and cemented them to the transmission cover and the rod cemented across the cover. I then positioned the second bar in contact with the boxes. The oil drum was detailed with some microstrip straps, as were the boxes. Handles were then added to the boxes. The rack under the hull machine-gun was filled with a tarpaulin made from green stuff. I used two goes, one to provide the body of the tarpaulin, the other to provide the detail as I was concerned that additional pressure might break the rod.


The two white boxes are scratch built from various profile strip and a Knightwing box is strapped to the hull deck with microstrip. Three sacks were sculpted as if hanging from the tow wire attachment and three rucksacks from the other side of the hull rear plate.


The hull was left British Tank Green (or Russian Uniform Green). The various bits of baggage were painted with various Vallejo greens and English Uniform Brown lightened with Khaki and Buff. The straps were khaki. The wooden crate was painted Vallejo Old wood. Green baggage was shaded with Citadel Athonian Camoshade, brown with Seaphim Sepia and Agrax Earthshade.
I painted some of the running gear and the exposed hull side with Vallejo Russian Uniform Green, though because I was going to cover most of it in mud, I did not make a thorough job.
A year ago I bought the British AFV pack from Warlord Games. It has various unit patches for the Guards Armoured Division, which used Shermans in Normandy. At the back of BTN there is a markings diagram for the Grenadier Guards. So the two tanks are from C Squadron. The baggage on the right rear hull obscures the tactical sign.
The decals were sealed with Humbrol acrylic matt varnish after they were dry (I used Humbrol Decal Fix to improve adhesion and smooth them in place). After the Device debacle, I made sure that each face was dry and varnished before moving on the the next. I used Citadel Typhus Corrosion for the mud on the transmission cover, tracks and running gear and the hull rear. Agrax Eartheshade was used to weather the rest of the hull. Citadel Nuln Oil was used for the fuel filler and spillage and around the gun mantlet.


Additional pictures:


