Showing posts with label M5A1. Show all posts

Friday, April 14, 2017

FT Tank, Part 1

So, as you saw in the photograph of the parts, this is a fairly simple kit.

The parts are well cast. the feeds have been removed (some final polishing is required).

As you can see, the turret top hatch is slightly difficult to clean up, imagine trying to smoothly file the head of a drawing pin.

The only problem is there are no mounting points for the tail skid, so it is (currently) in the wrong position. Check photographs carefully before assembly.


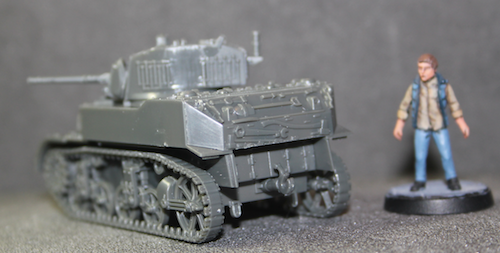
 Scaling photograph.
It is a very small tank, a Rubicon M5A1 for scale.

Thursday, January 5, 2017

M5 Combat Vehicle Stuart Gun Tractor (Stuart VI)

One vehicle I noted at Duxford was an M5 Stuart Gun Tractor.

Based on the M5 Stuart tank with the whole turret and supporting deck removed.

Unfortunately I could not see into the crew area.

This vehicle was used to tow the 17 Pounder anti-tank gun by British forces.

Not to be confused with the US M5 High Speed Tractor, which is a completely different vehicle.

Monday, August 15, 2016

Rubicon Models M5A1

Well, this tank is now in the completed as far as it goes category.


Here are some comparison shots with the Warlord Games M4. They are the same base colour, the M5A1 is just grubbier.


Saturday, August 13, 2016

Rubicon M5A1 Stuart VI work in progress - Weathering

So, I have finished the initial weathering. Looking at the photographs makes it easier to identify bits that need further treatment.
 Slight "smile" on the glacis.
 Odd flow effect on the side plate.
 Bit of a tideline on the right quarter above the spare track holder.
Slight gap in the weathering above one of the side skirt hinges.

Saturday, August 6, 2016

Rubicon M5A1 Stuart VI work in progress - block paint check

Here is a photograph of the Rubicon M5A1 with initial block painting and the start of decal application prior to finishing the painting and weathering.

The photograph shows any imperfections.
The 'crease' in the glacis where the plate was extended (due to a build error on my part) can be seen, and the grousers on the turret need tidying. There is also a registration issue on the unit serial number. There is also a gap in the turret where the two parts of the turret do not quite meet (just above the gun).

Some of the chipping around the driver's hatch is a bit excessive.

Sunday, July 31, 2016

Rubicon M5A1 Stuart VI work in progress - Awaiting painting

Well, after a rather long time, the Rubicon M5A1 is now ready for painting.
 I added a spare track holder on the rear right (it should project out further, I doubt you could fit in the spare track, but if I made it too prominent it might break in use).
 The track slots into the bottom of the fixing and is held in place by the clip at the top.
 Yes, I hid it on the left rear under a sack hanging from the lift ring.


Thursday, June 16, 2016

Rubicon M5A1 - Still work in progress

I have built up the front glacis plate.


I still need to smooth the transition, probably with watered down lilliput.

And added some more stowage.
 I did worry about the location of the exhaust pipes, but they are underneath the engine access doors so the bucket (when added to its handle) will not be in the way.

Tuesday, May 31, 2016

Rubicon M5A1 Stuart VI work in progress - Lift Rings

So, after a discussion on the Rubicon Models forum, and purchasing some 0.7mm brass rod, I went about replacing the lift rings on the glacis.

First I cut off the strange moulded "handrail".

Then I drilled two holes, one at the top of the "handrail", the other at the bottom.

Unfortunately I used a 1mm drill (intending to use 1mm brass rod). With the tools available I was unable to achieve a suitable ben in 1mm rod, but managed it with 0.7mm rod.

If I had started this before assembling the kit, I would have used the handrail jig (an etched brass sheet with holes for bending model railway handles - for 28mm models I tend to use the 7mm scale jig).

On the bright side, it did mean it was easier to get the lifting ring into the holes ^___^.

Having fitted the ring, I then used liquid poly to fix it in place, applying it to the ring so it would flow down and fill the hole (but possibly the ring as well).


It does look like the ring has been filled here, so needs to be reamed out a bit.

On the plus side, it did not flow all over the glacis.

Sunday, May 22, 2016

Did not do the research part 94...

The ongoing saga of the Rubicon M5A1 has hit a snag, due to my research failure.

When I initially assembled the kit, I was not going to add the sand shields, because none of the pictures I could find of Guards Tank Division Stuarts had sand shields. Unfortunately I had not removed the pieces that were attached to the hull, so decided to fit the shields.

Below is a detail shot of the glacis. What is noticeable is the gap between the bottom of the glacis plate and the support for the mudguard/sand shield. You might be able to see that the top of the glacis projects above the deck (covering a gap).

I decided that the support should be in contact with the glacis, and the glacis more or less flush with the top of the deck - the distance being about the same.

So with a bit of trepidation I used a scalpel to remove the glacis plate, cleaned up and re-fixed the glacis in the new position. This left a gap (between the hatches) where the deck met the glacis. I used some micro strip to fill the gap (the white line in the picture below).
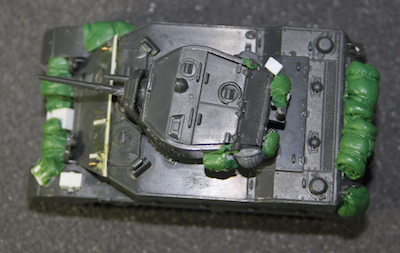
Ignorance can be bliss. I was looking for some pictures of the track of the M5 series light tanks when I found a picture of one with the sand shields. There is a gap between the glacis and the support, so the upper shot is correct.

Unfortunately, as you can see above I have inserted pegs to support the stowage I will be adding.

Ho hum.

Oh, and here is a detail shot of the track.

Friday, May 20, 2016

Rubicon M5A1 Stuart VI work in progress

Okay, a bit glacial.

So after discussing the subject of sand skirts on the Rubicon forum, I attached the sand skirts.

Some filling will be required on the rear part of the skirt (have a look at the rear view later).

One thing to note on the above photographs is the position of the Glacis plate. I glued it on far too high, there is a large gap between the bottom of the plate and the sand shield/mud guard fixing. So I had to remove it and re fix it nearer the correct position. Unfortunately this left a gap at the top. I used a piece of micro strip to fill in the gap at the top (the white line on subsequent pictures).

I then drilled locating holes and added armatures (square section plastic rod/tube) and fixing points for stowage. I also added two Bolt Action British helmets, hanging from the turret lifting rings. I think that they should be proper tanker type helmets, but they are not available ready made.
The driver is not very popular, his pack is hanging on the front (the other packs are on the turret), though it does provide him with an incentive not to drive through too many puddles.

The mounting points on the rear of the hull project through (sort of) the first tarpaulin to provide a fixing point for subsequent soft stowage.

Tuesday, April 26, 2016

Rubicon M5A1 Stuart VI

At Salute this year, I picked up a few Rubicon kits, including the M5A1.

The kit went together easily. The only issue I had with the kit was the fixing of the mantle onto the gun barrel. It still looks a bit squint.

Photographic evidence of British use of this Lend-Lease tank in British service is scarce. I might have used the wrong turret option (the turret is the early version without the shield around the anti-aircraft gun on the right hand side).

Here are a couple of pictures.

Some tidying up is required, the rear plate of the hull needs a bit of tidying.

As I used the early form of the turret, and the colour plate in British Tanks In Normandy did not show  the rear hull basket, I did not use that option.

Stowage will need to be added.